Integrate Collector with Workforce | Create Assignments from the Field
Workforce for ArcGIS is a powerful coordination tool that streamlines field to office workflows. With defined user roles, every team member has their designated role. Dispatchers create and assign work to Mobile Workers, who go into the field to complete the assigned work. This transparent workflow enables efficient coordination, allowing Mobile Workers to report back to the office once they’ve completed a given assignment. Workforce for ArcGIS is a platform designed for field work optimization. Commonly used for inspections and service requests, Workforce for ArcGIS offers real-time awareness for your entire team.
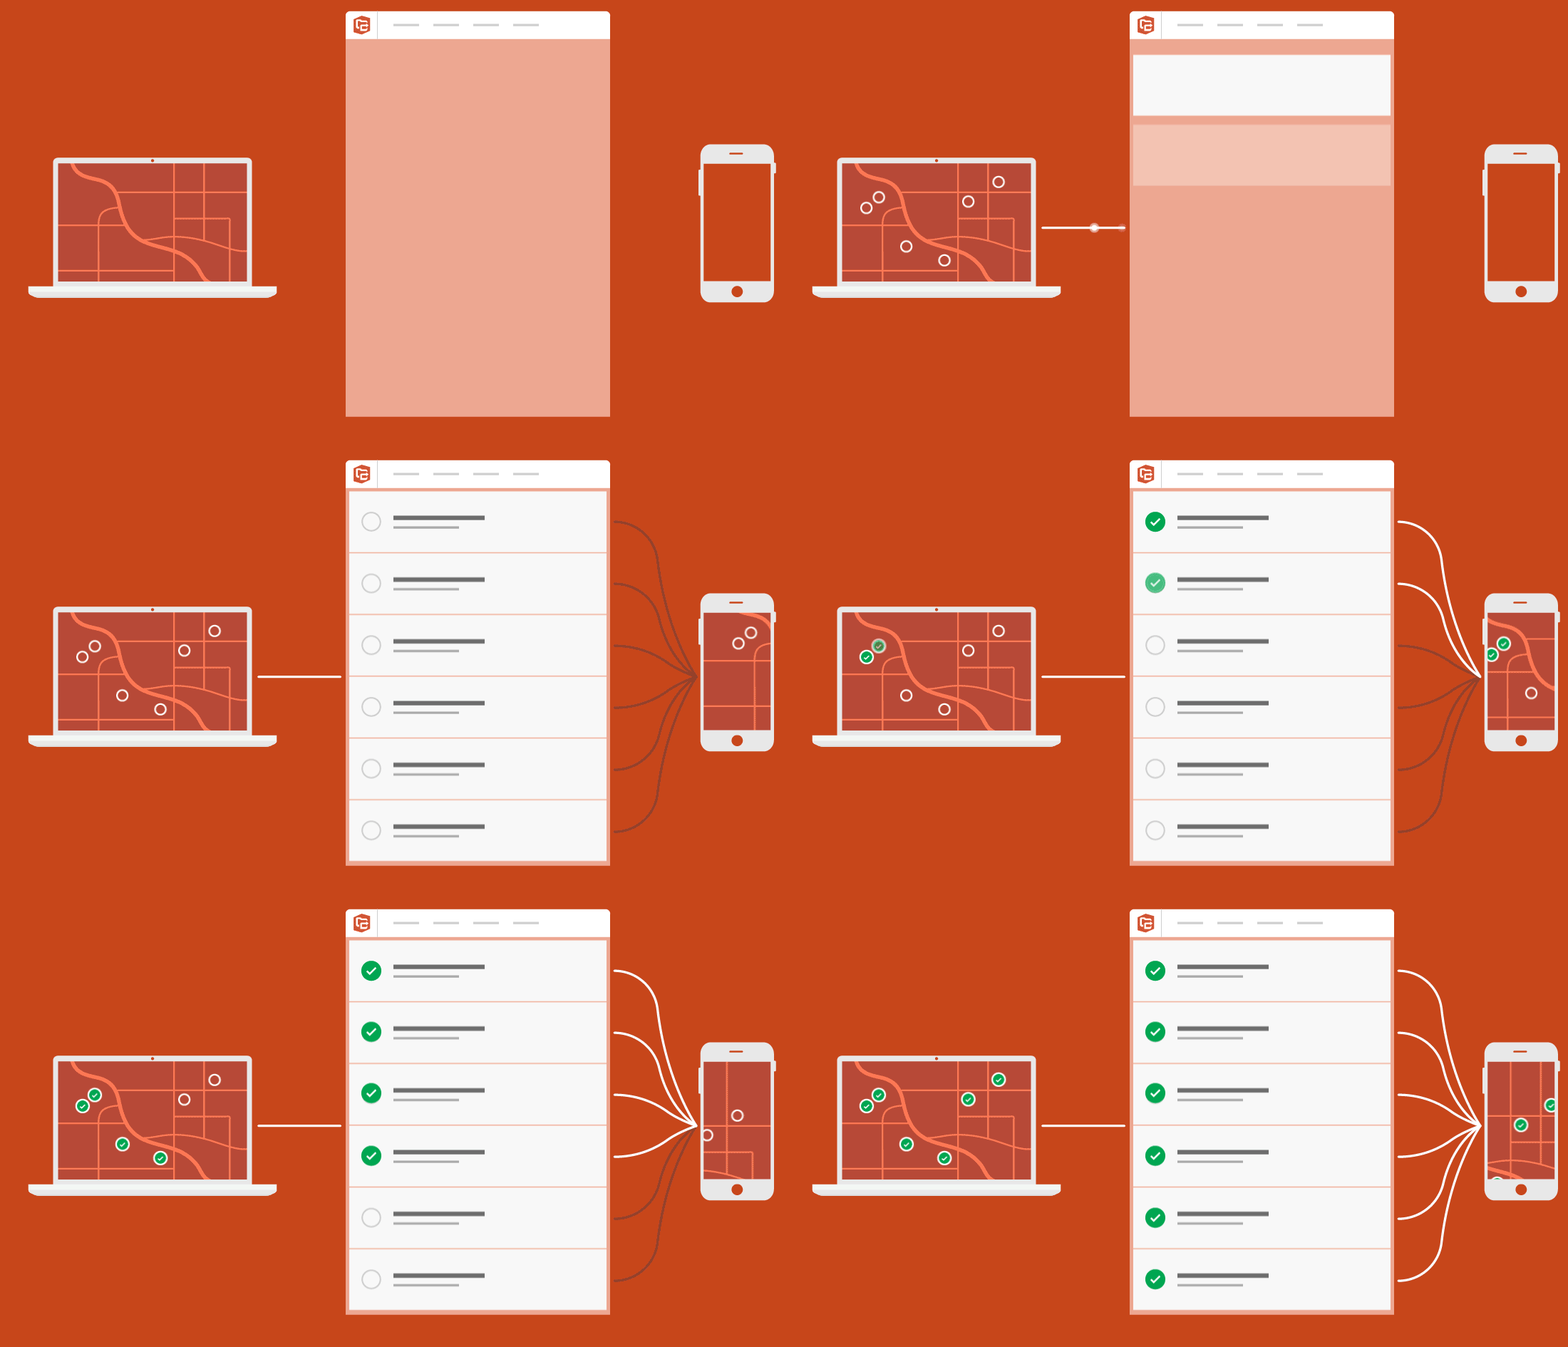
A powerful aspect of Workforce for ArcGIS is its ability to integrate with other esri applications, like Collector for ArcGIS. The Collector field application offers the power to collect location data, track your work, report findings, and capture photos and videos from the field.
Collect data in the field to gather important location data, take detailed photos and field notes. Go offline to streamline field work, without the need for data connection. Download maps ahead of time for easy access in remote locations. Or prepare maps for larger areas by using basemaps versus downloaded maps. And sync maps once you’ve reestablished a connection, to keep all your maps up to date.
Integrating Collector with Workforce offers many benefits. Enhancing Workforce with Collector empowers Mobile Workers to create their own assignments from the field, without having to rely on Dispatchers.
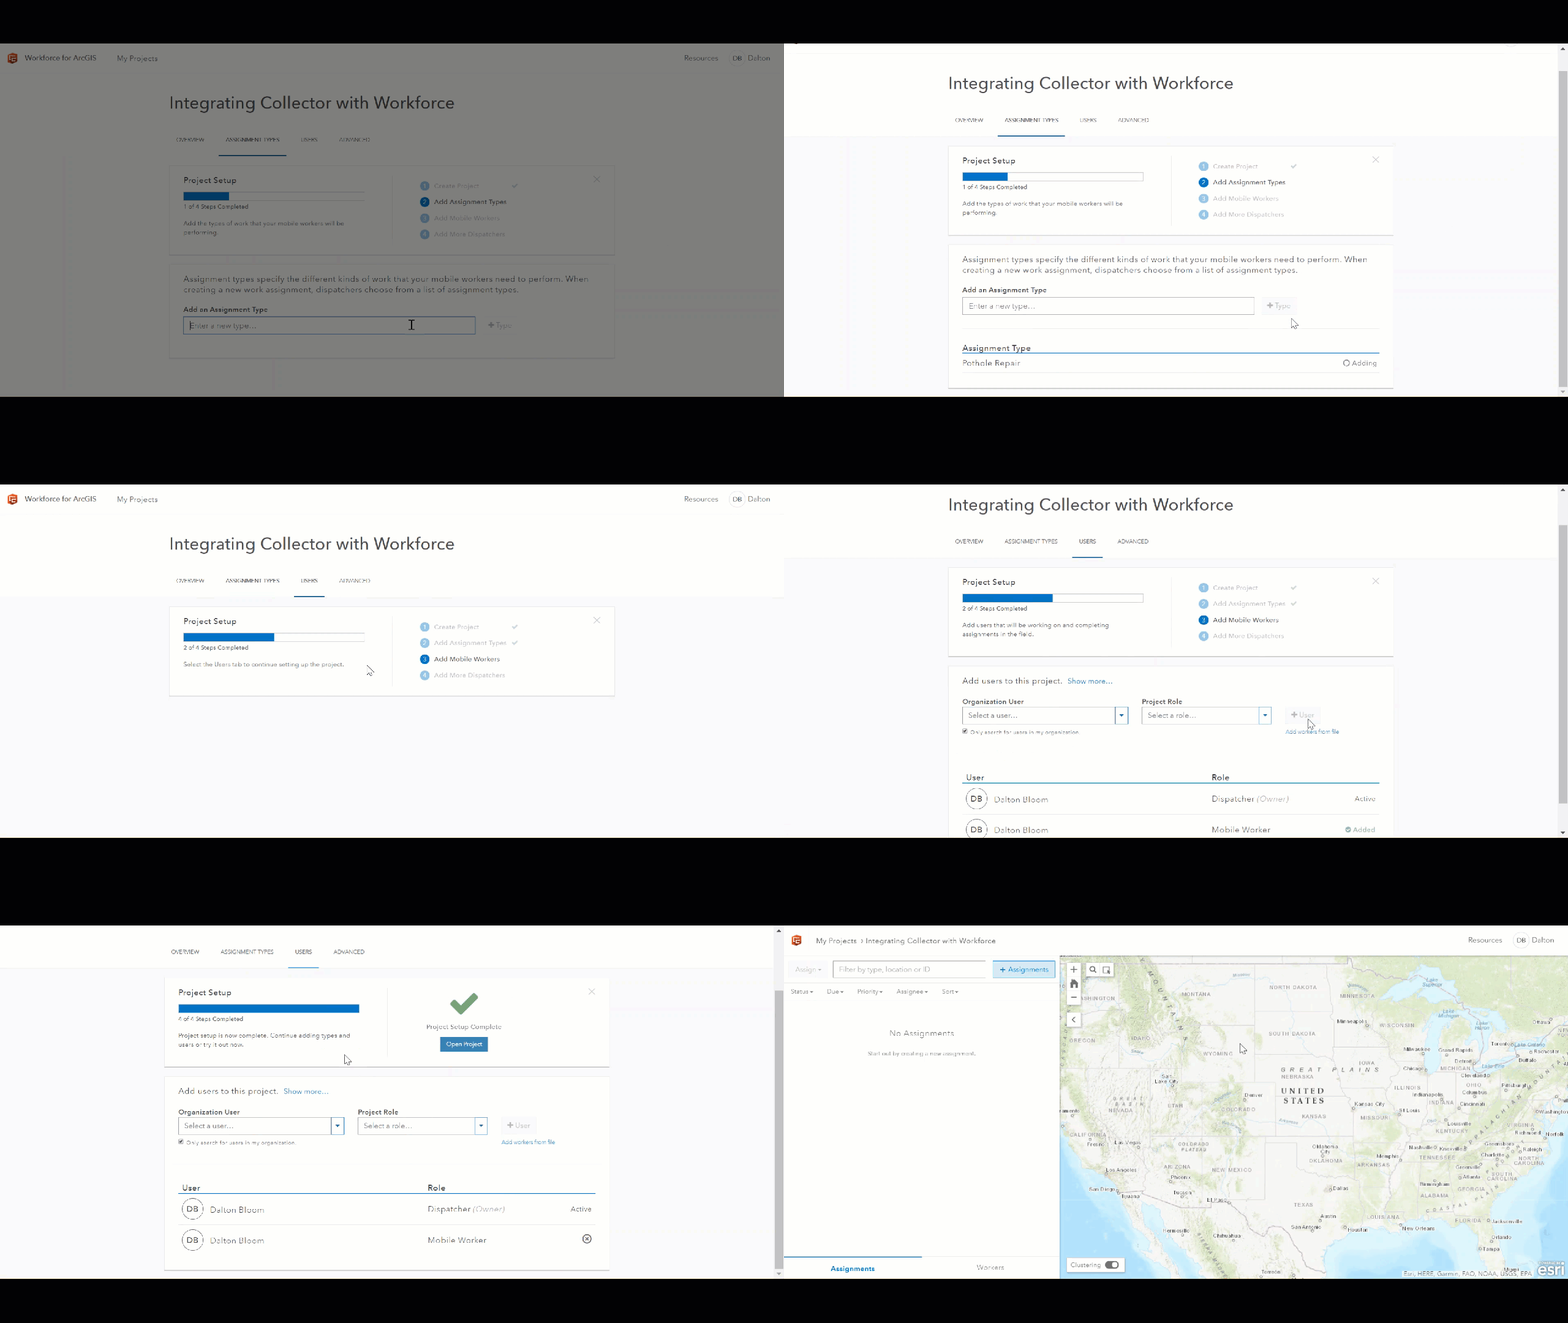
Let’s walk through the step-by-step process to outline how to integrate Collector with Workforce for ArcGIS. First let’s create a new project in Workforce that will require the creation of new assignments from the field.

During the creation process, determine the assignment types and project roles for team members in your organization. Project roles include Dispatchers and Mobile Workers.
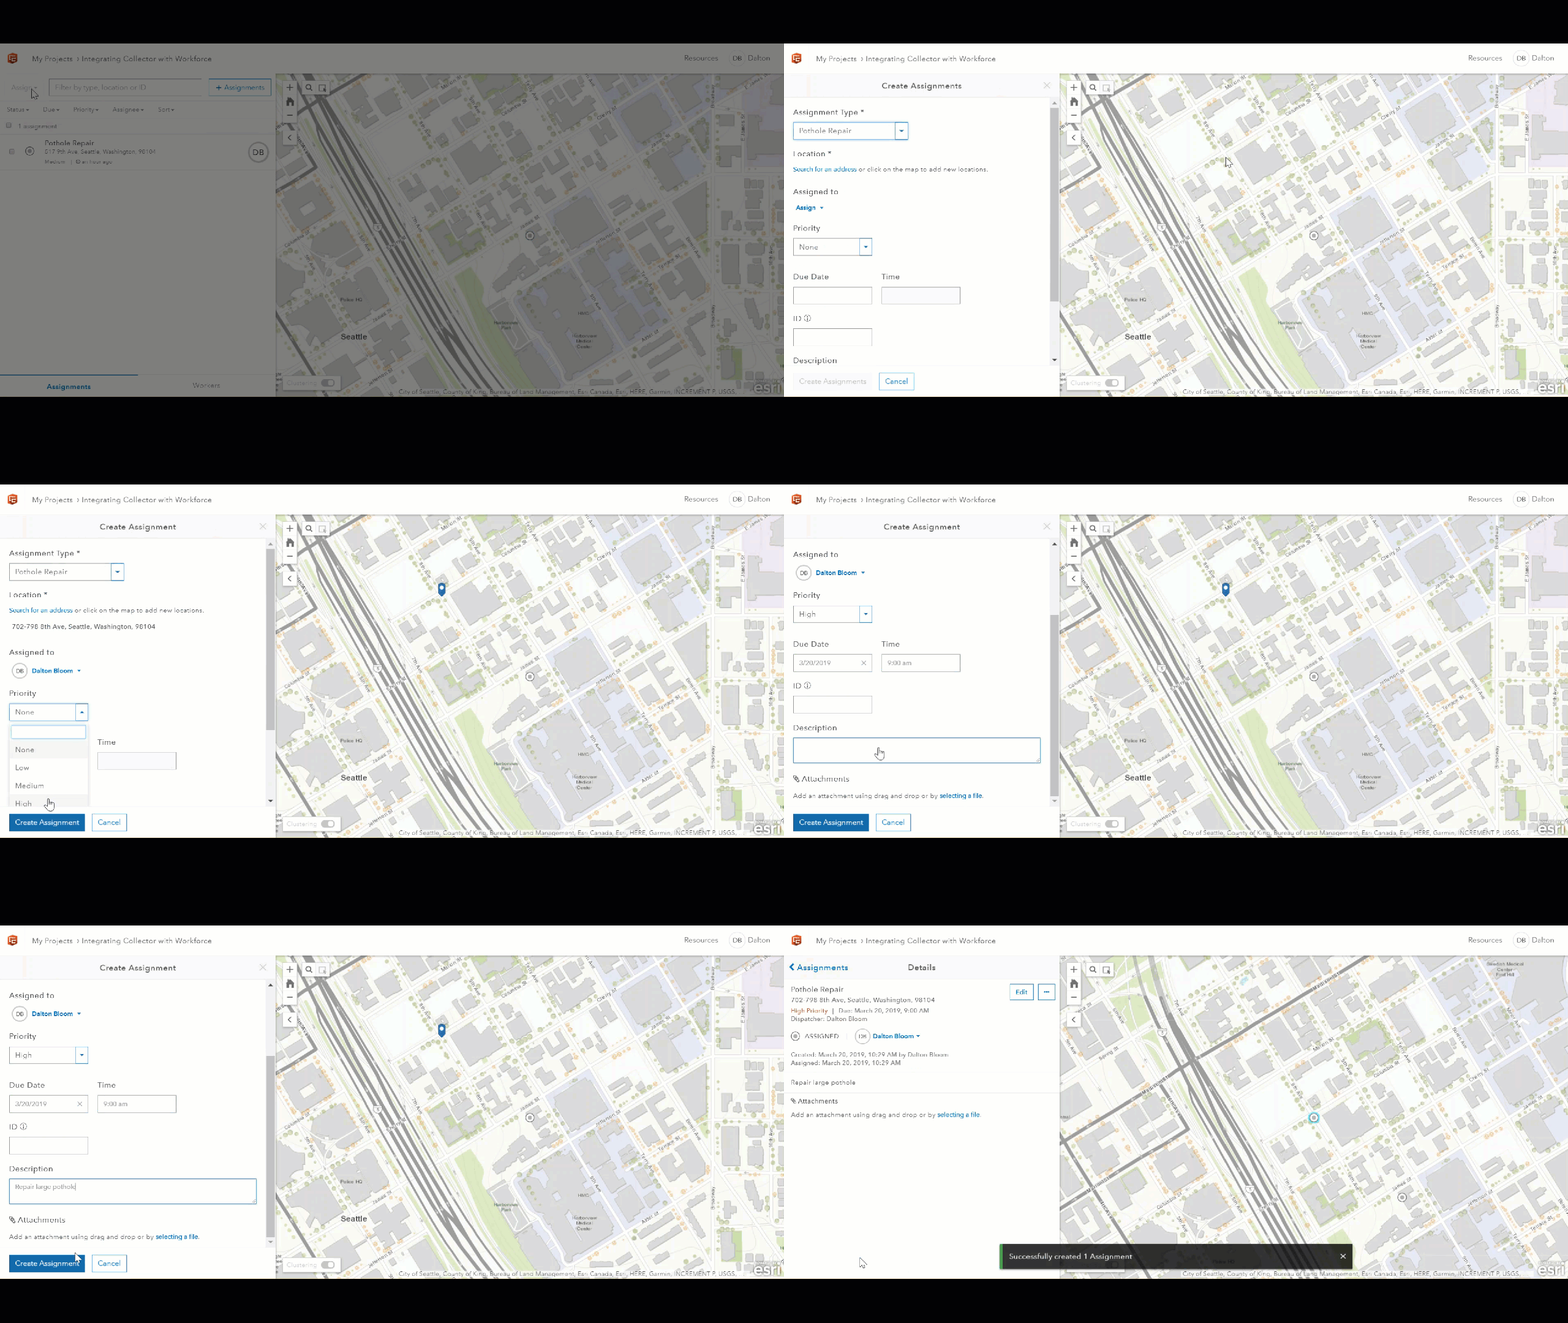
Next, let’s create an assignment and assign the task to a mobile worker in the field. We’ll choose the assignment type, location, priority level, due date, and description. Optionally add any attachments that may be helpful for the mobile worker to view in the field.
Creating a view of the assignments layer will give access to the assignments from Collector for ArcGIS. After creating the Workforce project, the assignments layer will be visible within your ArcGIS Online content. Click the assignments feature layer and follow along with the process below.
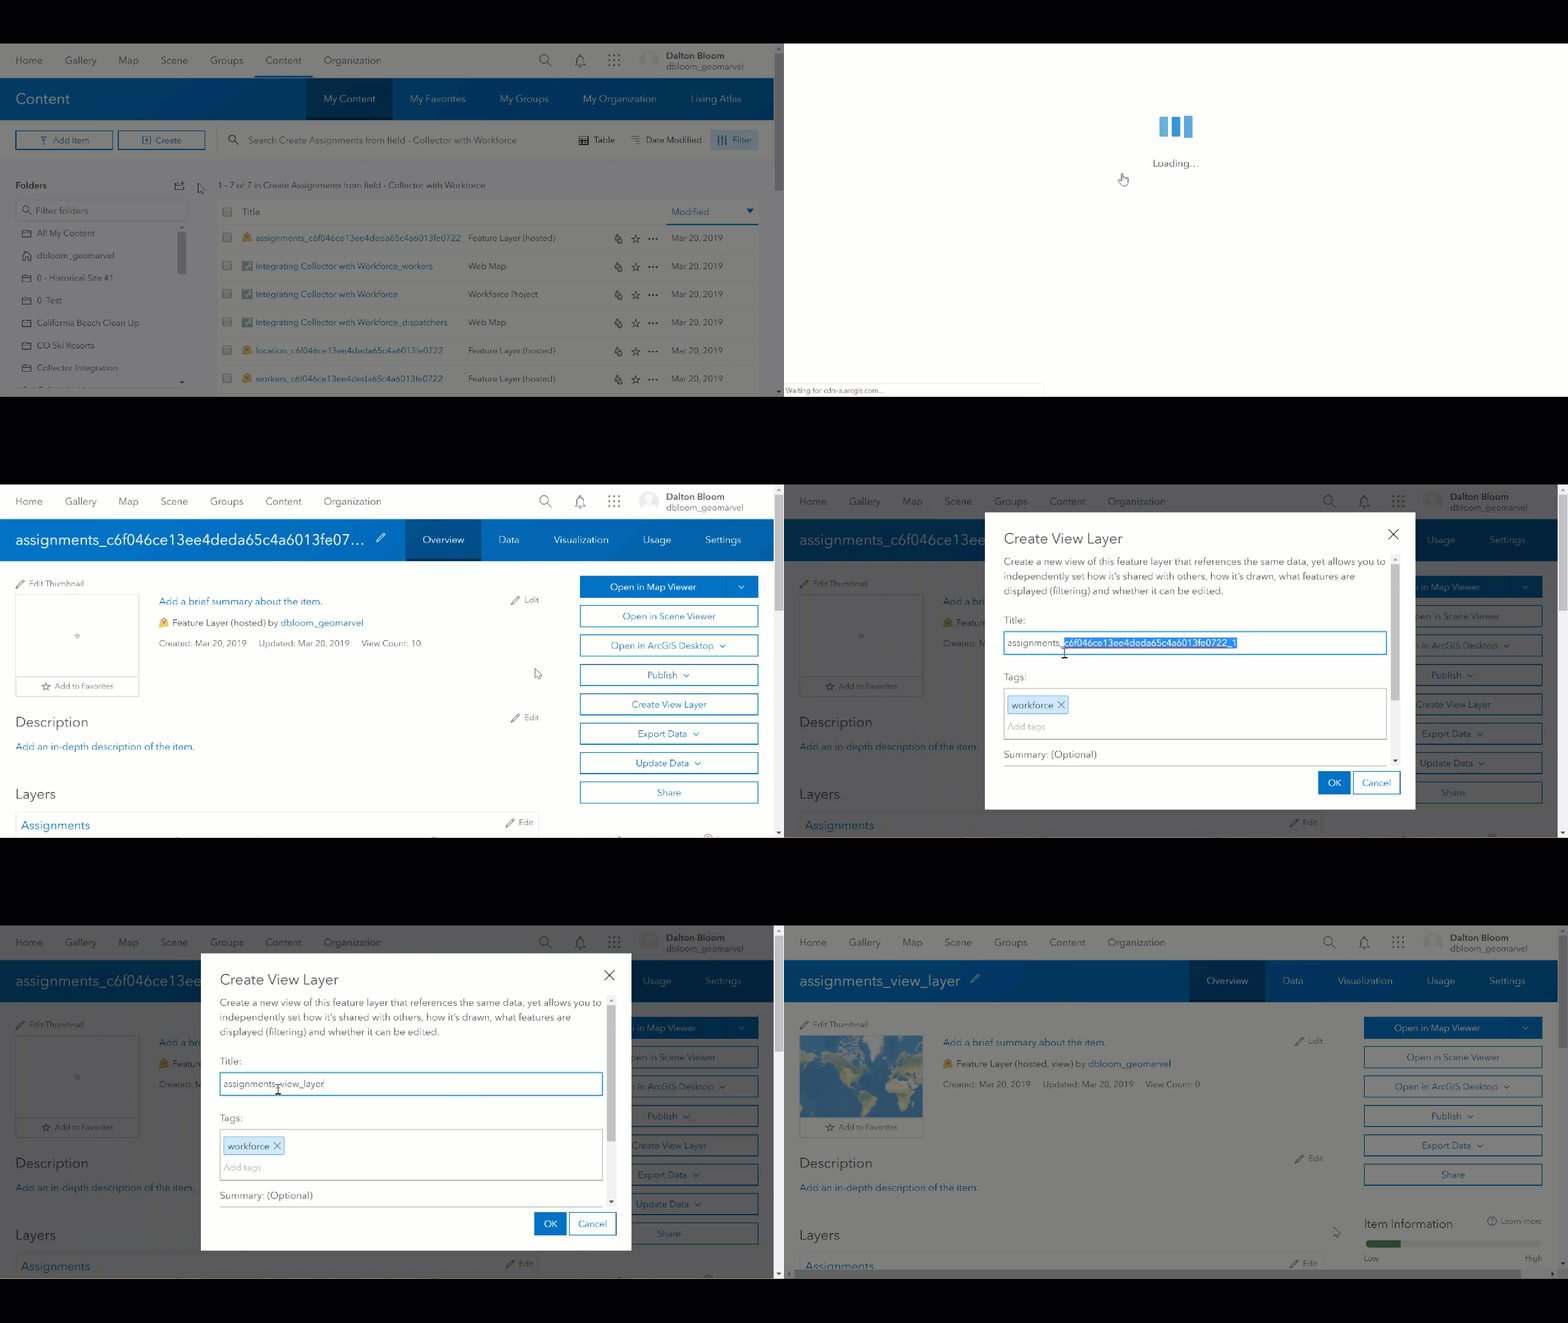
With the assignments view layer created, let’s define features to include only those assignments with a status of “Unassigned”. This will ensure that Mobile Workers can only interact with unassigned features.
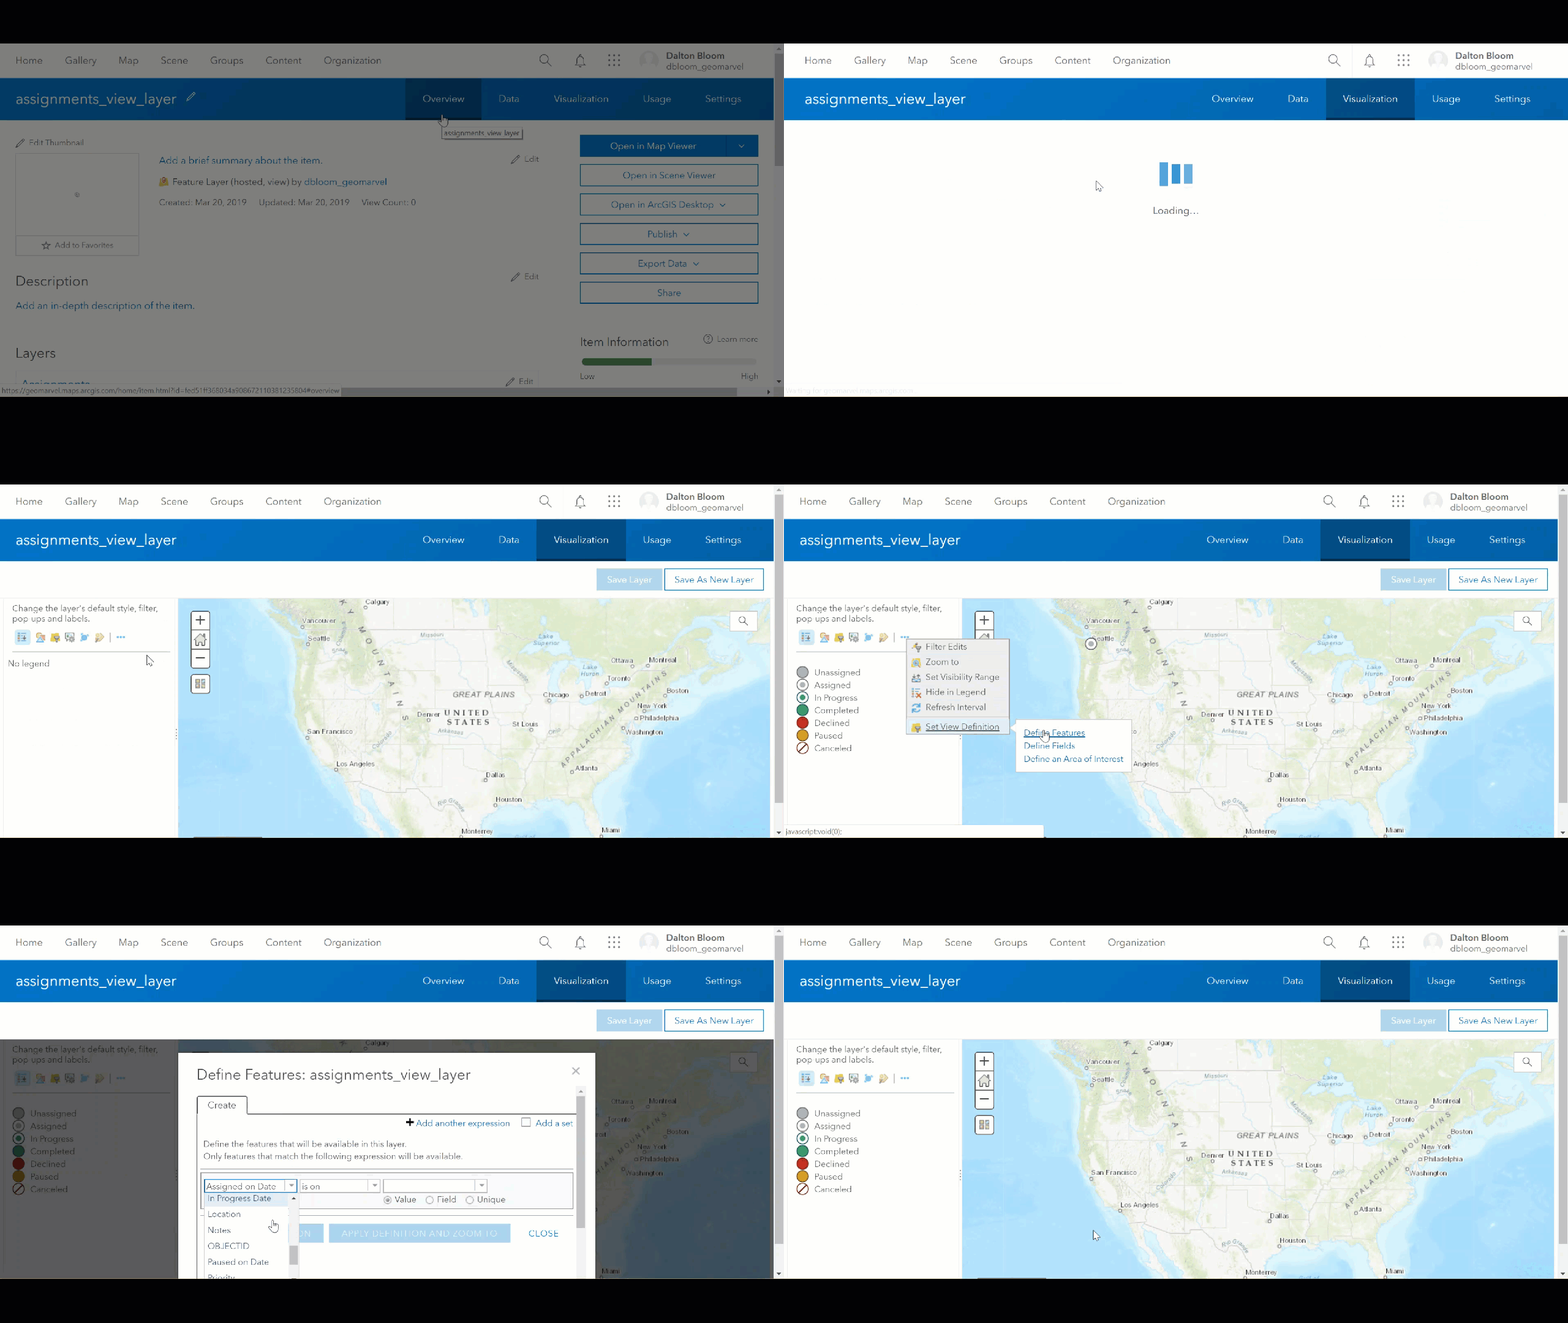
Define fields to include: OBJECTID, Description, Status, Priority, Assignment Type, WorkOrder ID, Due Date, GlobalID, Location, CreationDate, Creator, EditDate, and Editor.
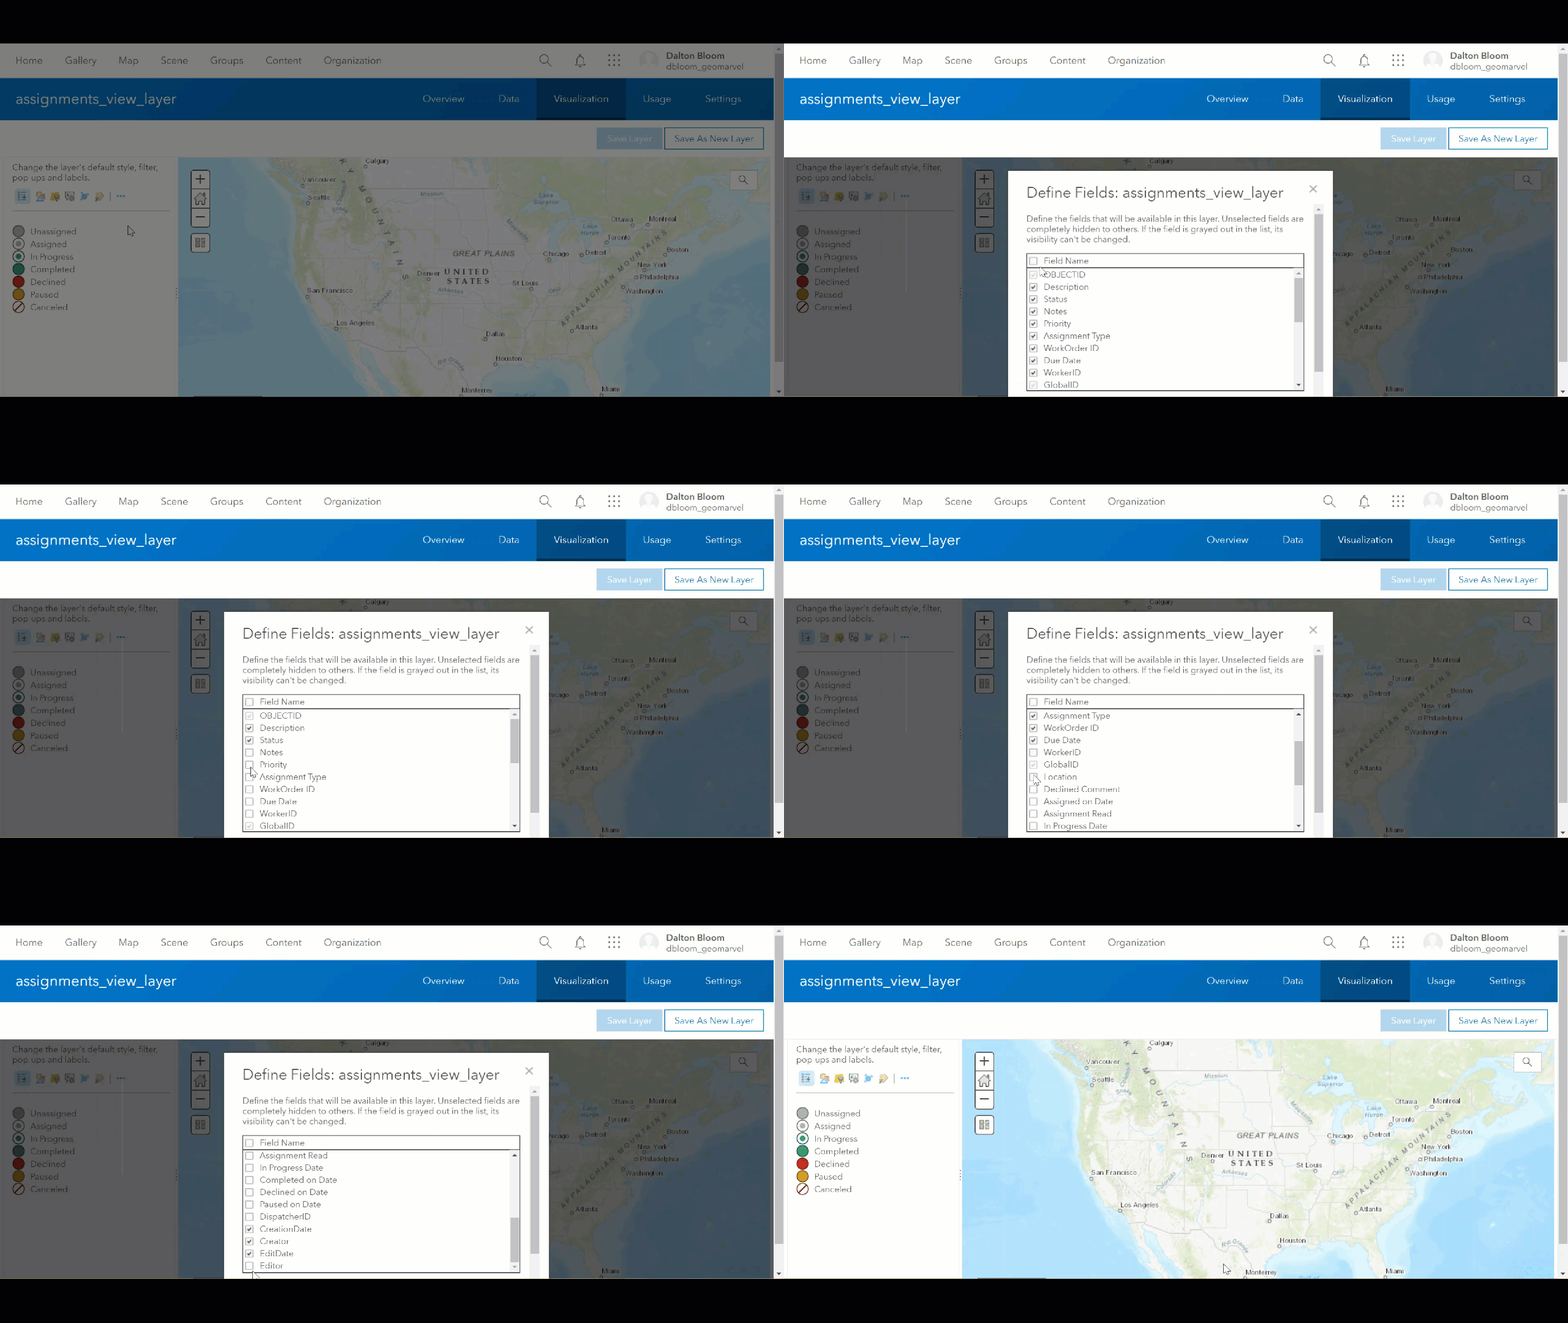
Configure the pop-up to depict only the important information for Mobile Workers to see. Changing the pop-up title to show assignment types will be better suited than the assignment description. Then, rearrange the list of field attributes to set the order in which a Mobile Worker will interact with an assignment creation. To remove a field attribute, like Status, simply click “Configure Attributes” and deselect both the “Display” and “Edit” check boxes, then click “OK” to save your work.
Navigating to the “Settings” tab will allow you to enable editing and set the editing permissions for the assignments view layer. Check the “Enable editing” and “Enable Sync” boxes. We’ll keep most of the default editing permissions, but let’s select the option where “Editors can only edit their own features (requires tracking)”. This will ensure Mobile Workers cannot edit any features that they have not created.
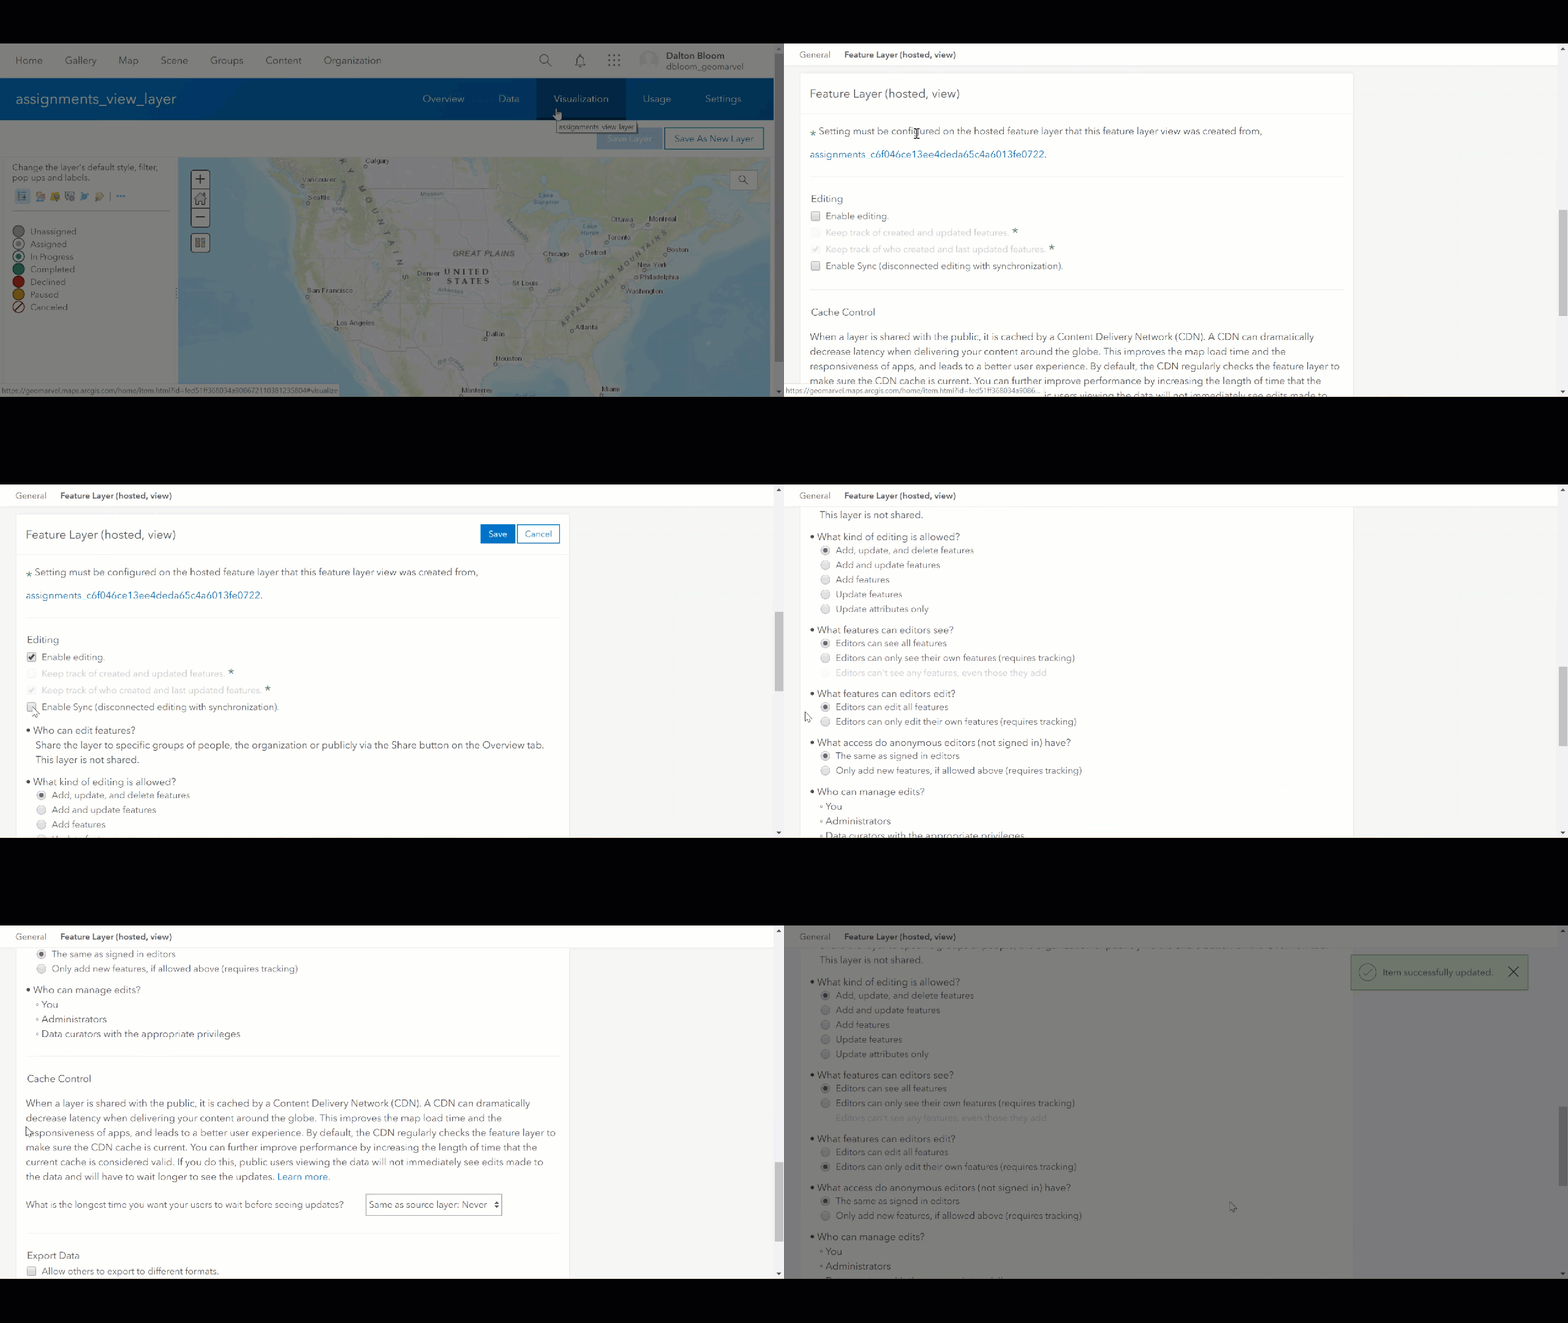
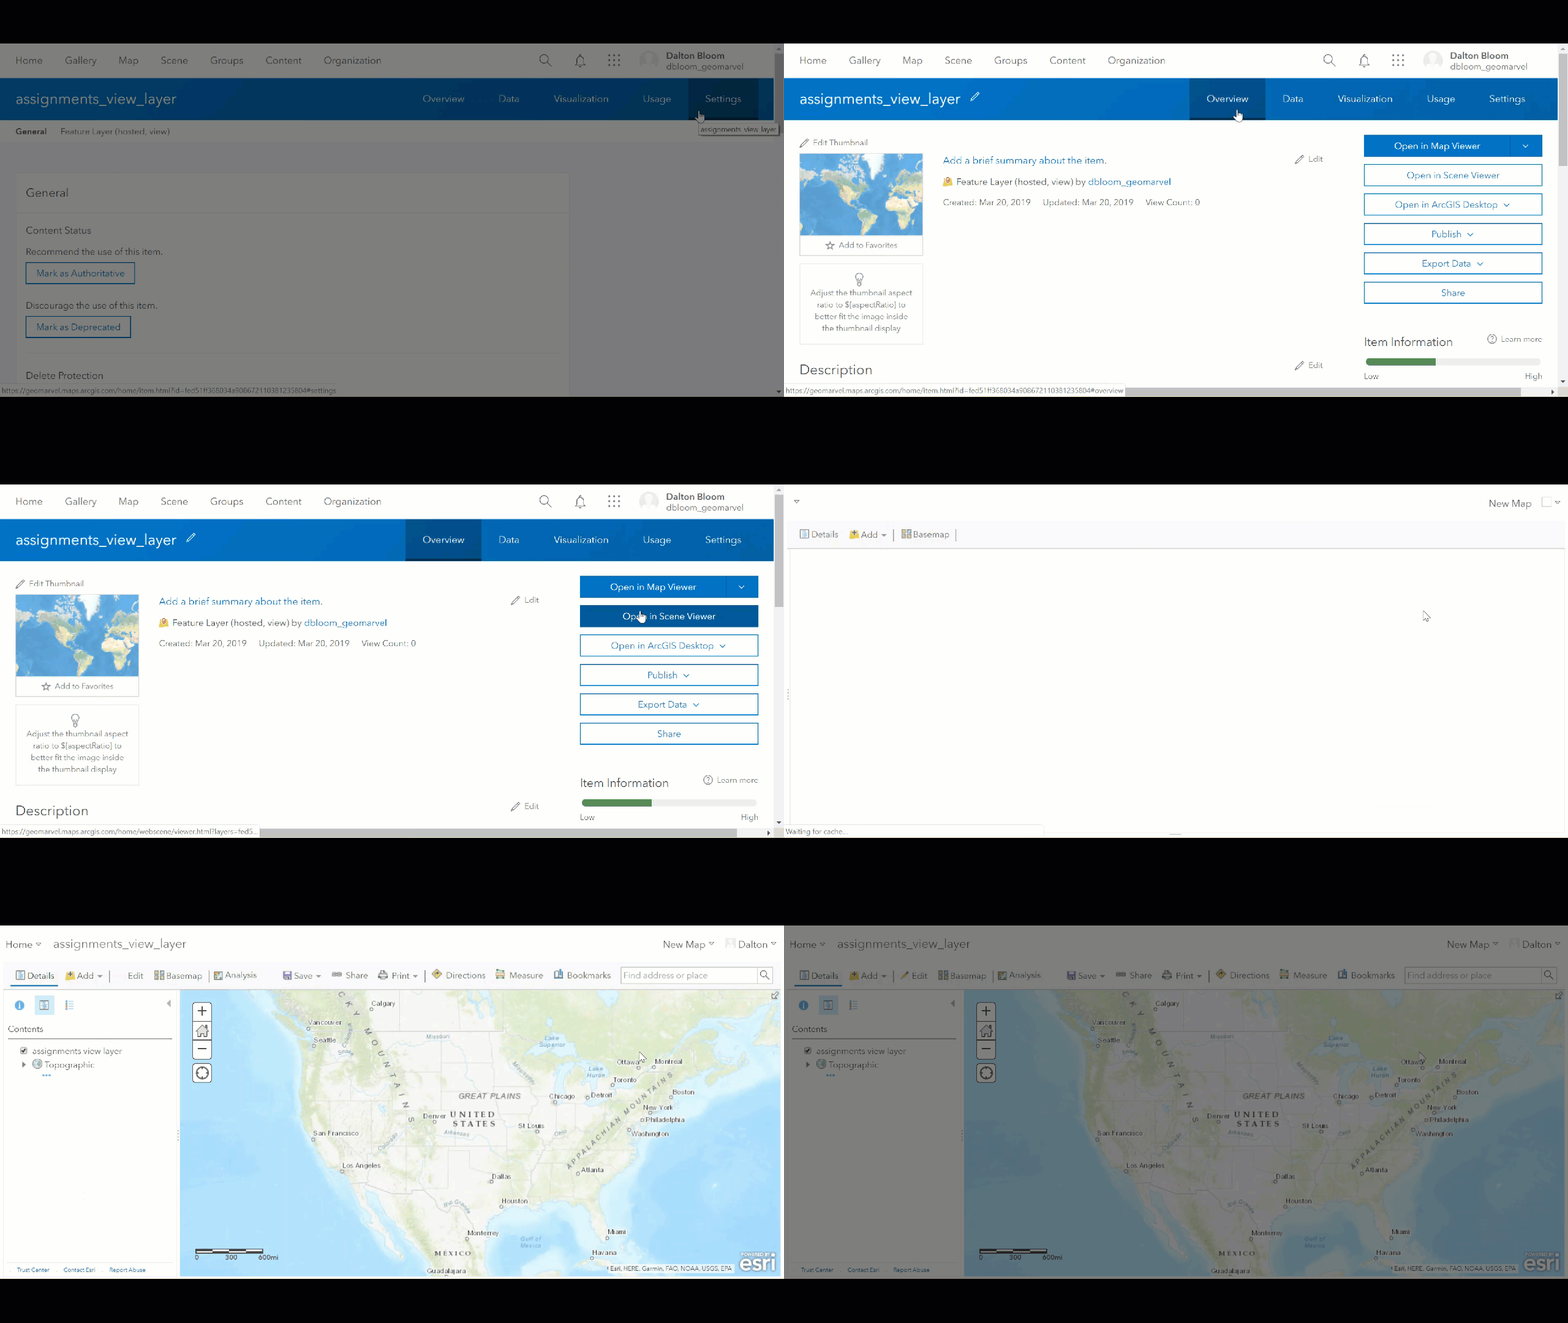
Now it’s time to create a new webmap that contains the assignments view layer. From the “Overview” tab, choose the dropdown next to “Open in Map Viewer” and select “Add to new map”.
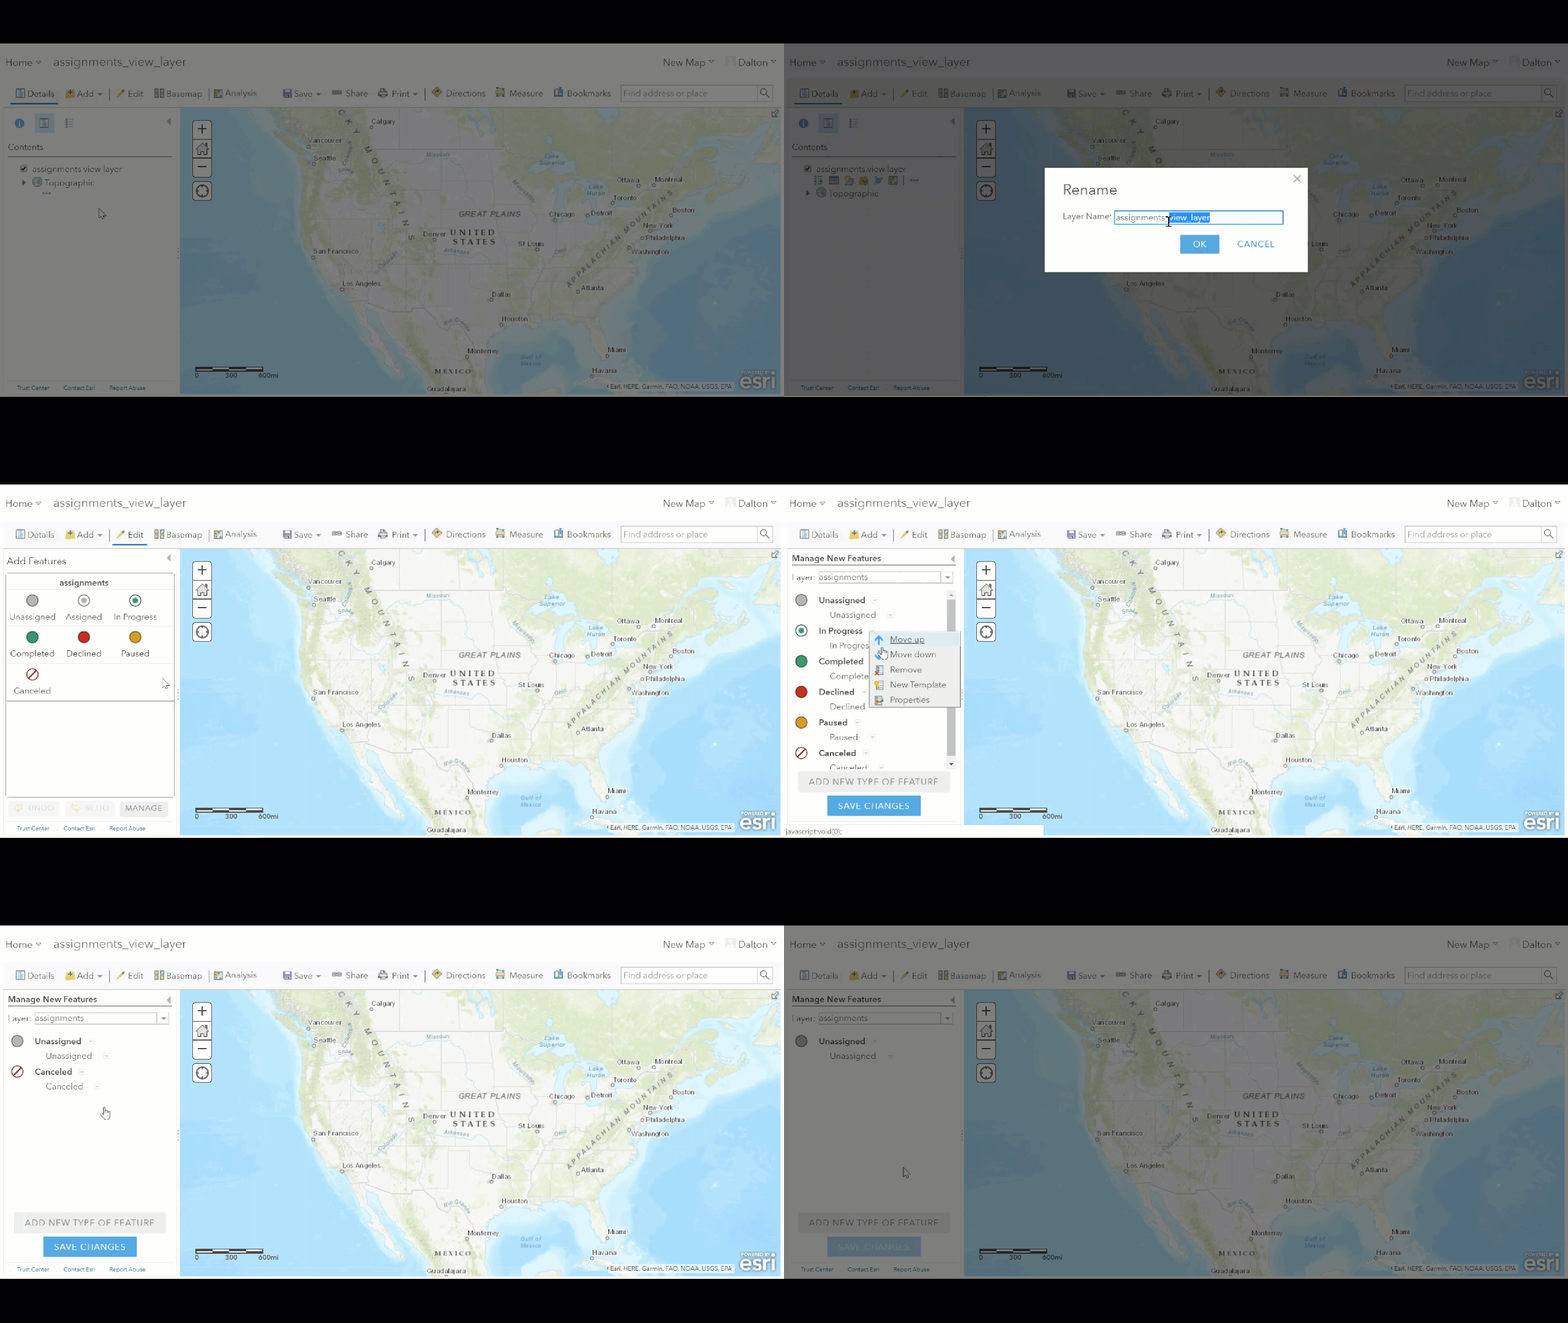
Let’s rename our assignments view layer to “assignments”. Then we’ll remove other feature types until just the “Unassigned” feature type remains. This simply cleans up the data view, as Mobile Workers can only create unassigned features from the field. Clicking “Edit”, then “Manage” will allow for the removal of these extra feature types.
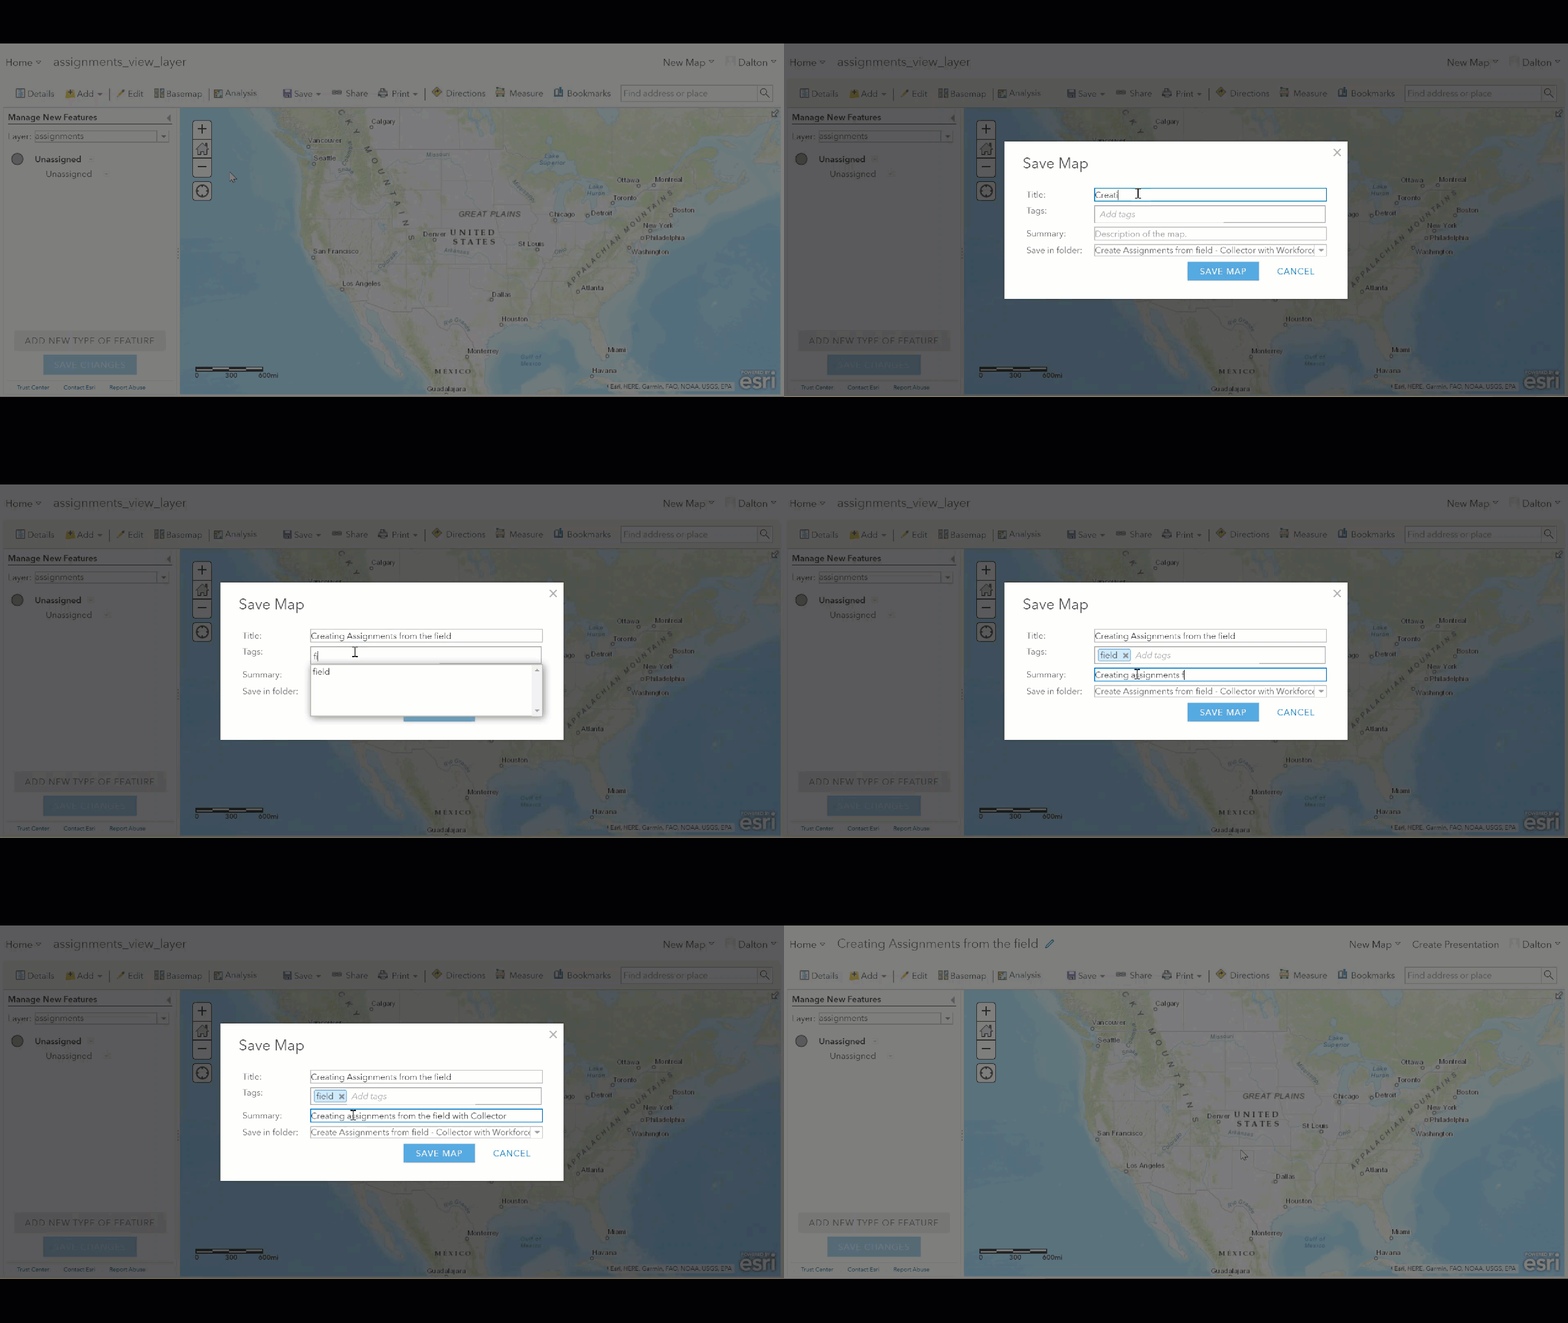
Save the map with an appropriate title, tag(s), and summary.
Now it’s time to share the map with your Mobile Workers. Click “Share” and select the group that was created along with your Workforce project. The group name should match the name you gave to your Workforce project. Then save your map.
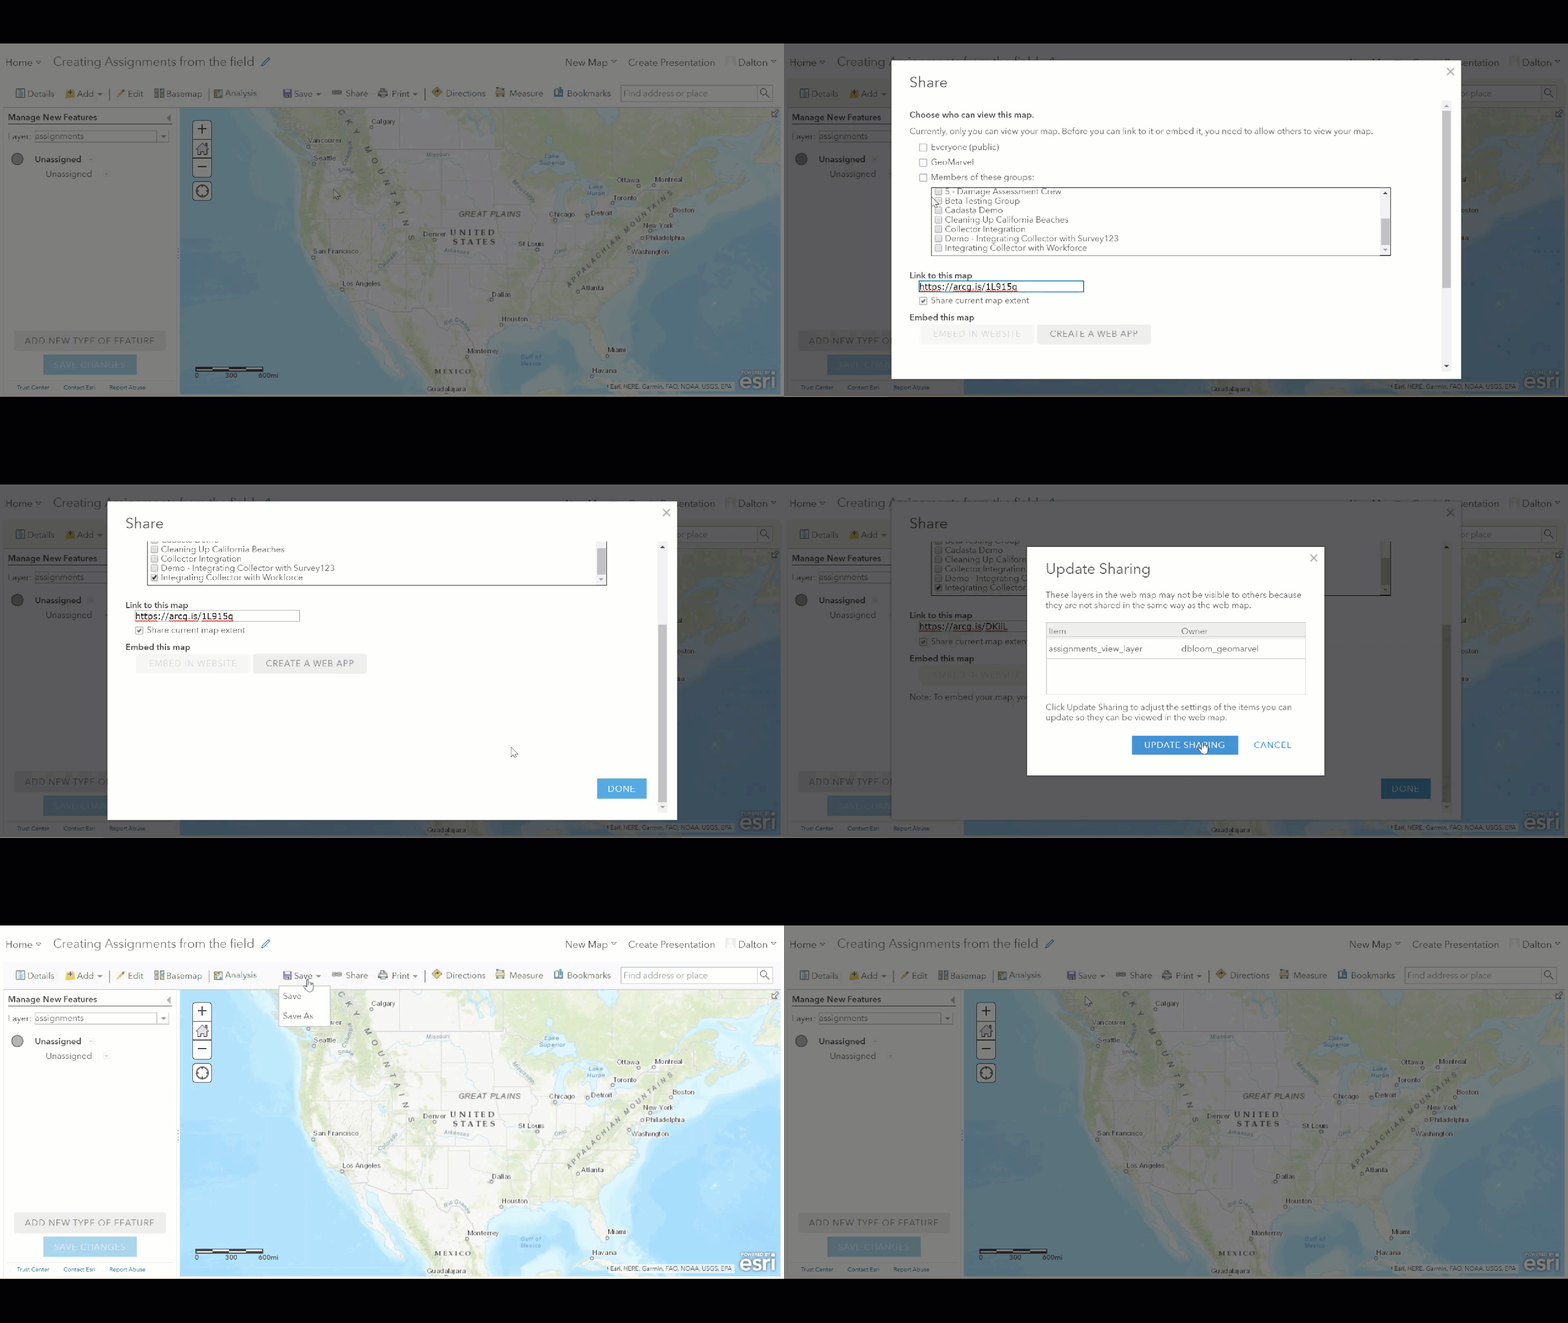
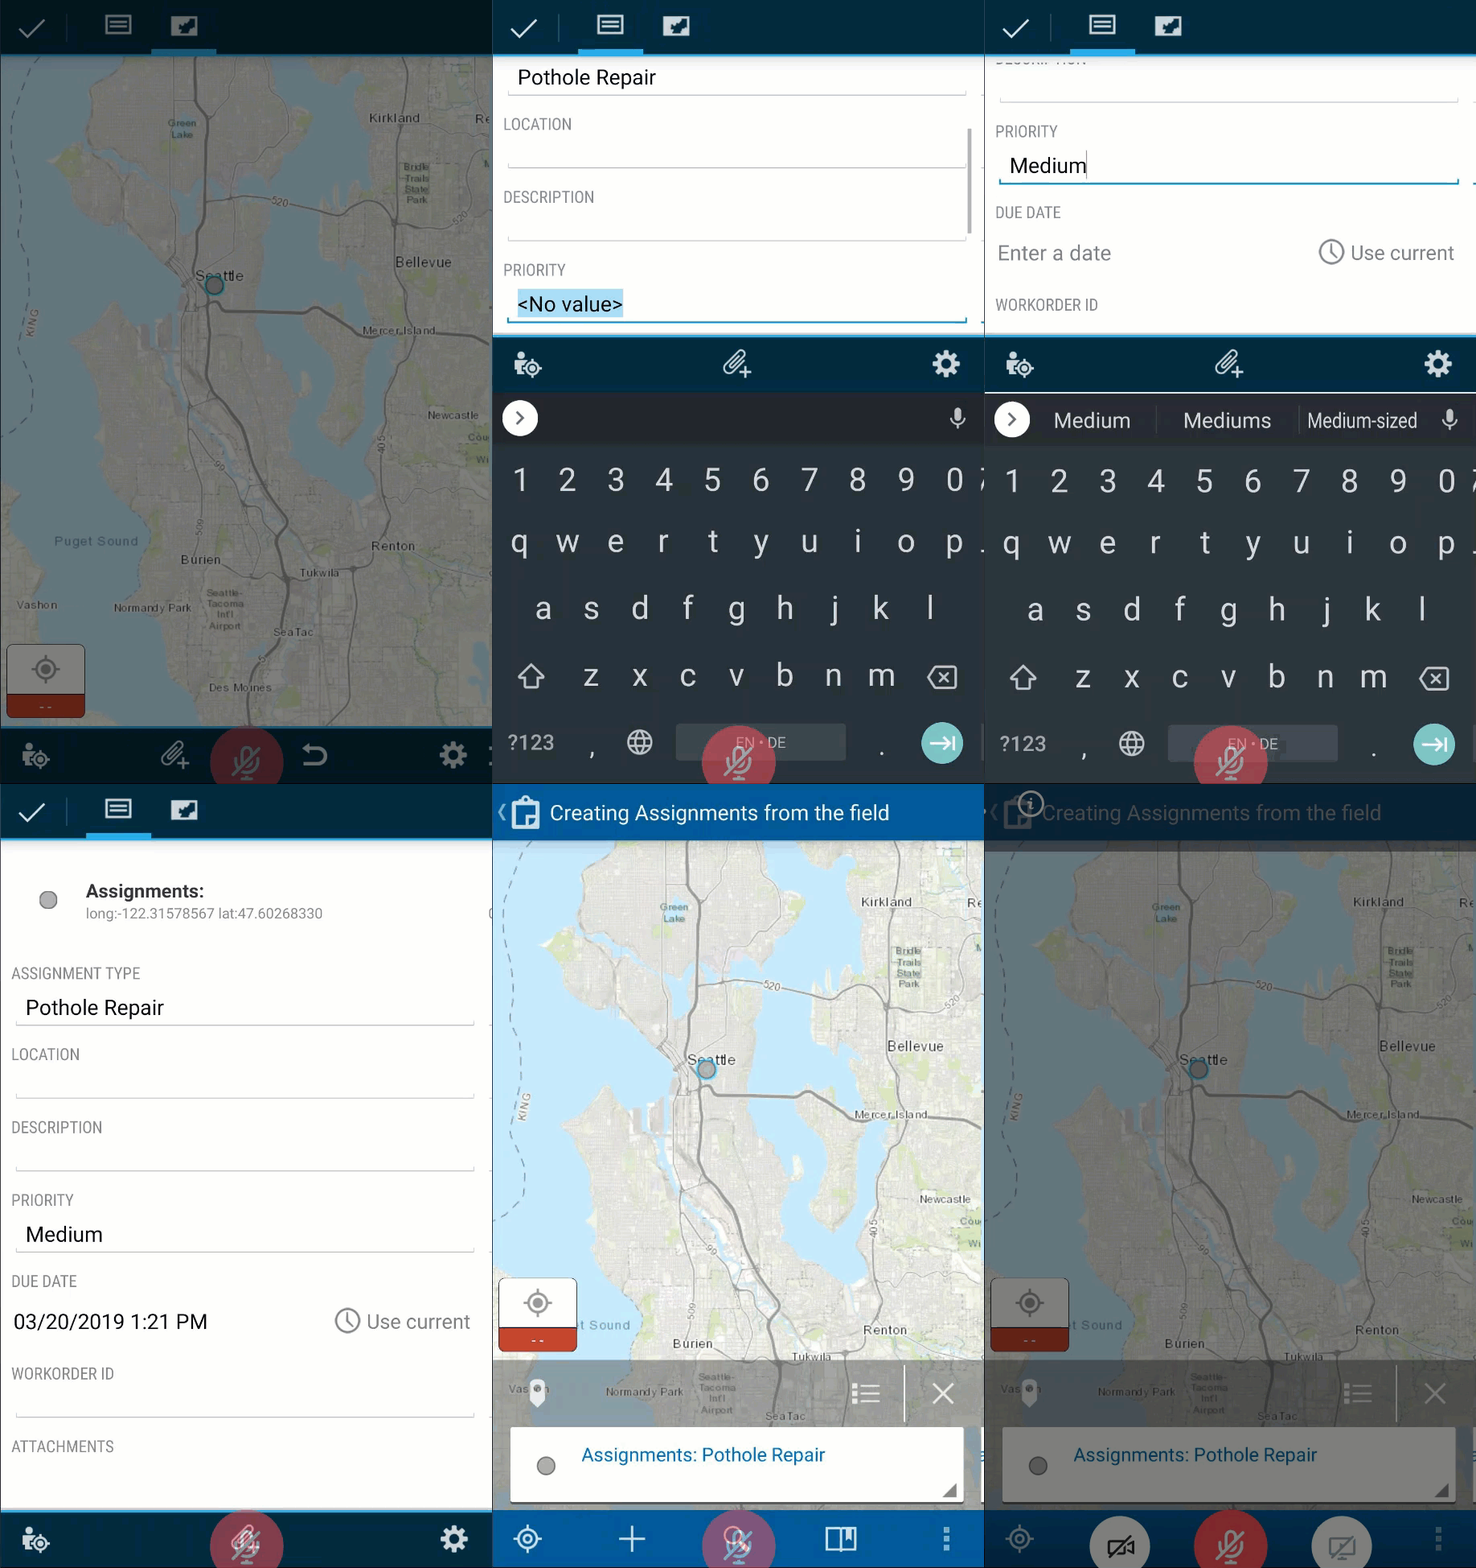
The assignments view webmap is now visible from the Collector app, where a Mobile Worker can now create a new assignment from the field.
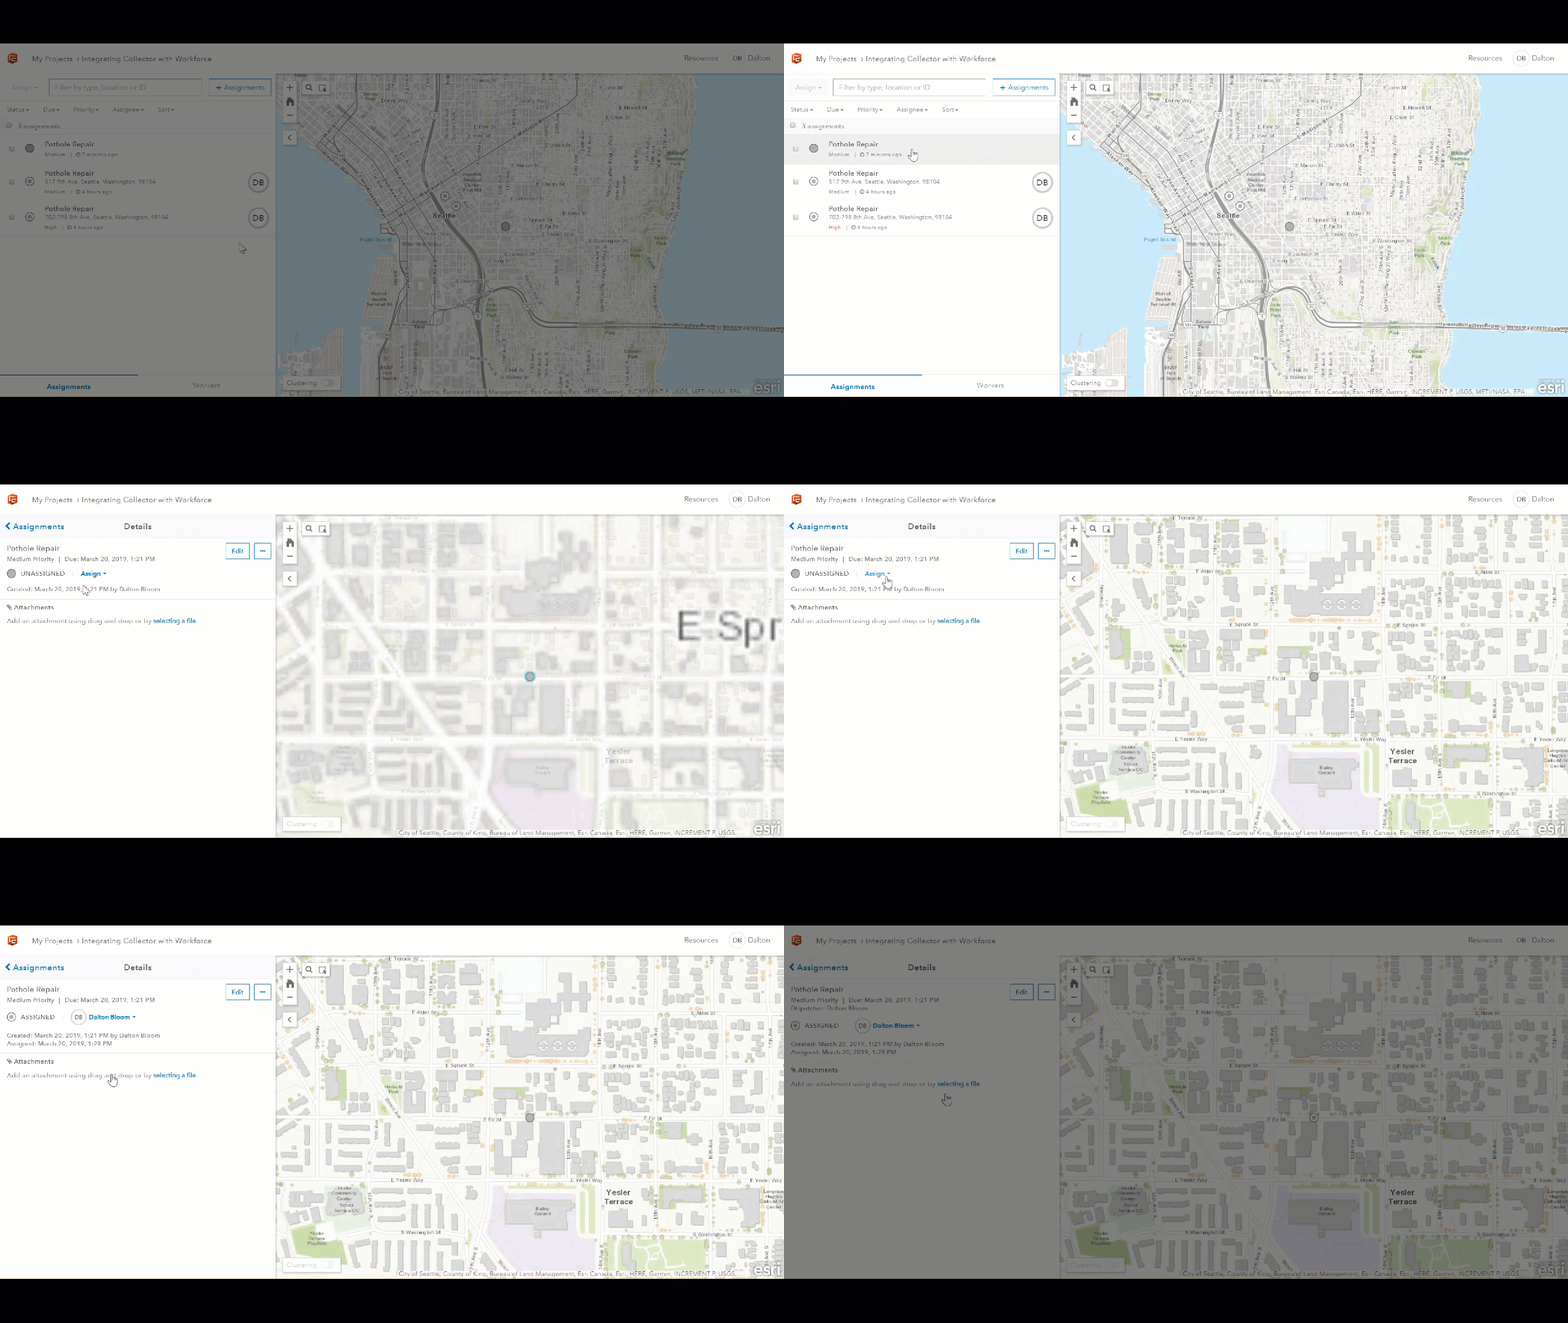
Notice the assignment created from Collector is now visible in the Workforce project. A Dispatcher can now click on the newly created assignment and assign it to a Mobile Worker for completion.
We hope you’ll find this workaround helpful for all your mobile assignment creation needs. In the future, users will be able to create assignments from the field straight from Workforce for ArcGIS. But as this isn’t yet possible, this Collector for ArcGIS workaround will do the trick for now.
Get Support
Want to integrate Collector with Workforce to create assignments from the field? We can help! Contact our GIS experts to start a conversation today.


