Welcome to our latest GeoMarvel Live! demonstration! Today we’ll follow Harman Hassan, an application developer here at GeoMarvel, for Part 2 of our “ListModels & ListViews in QML” series. In this demonstration, we’ll take our existing knowledge from Part 1 and build upon that. We will learn how to dynamically populate data into our ListModel, by creating a Contact List for our application. Let us begin!
In Part 1, we first established how to get users started working with ListModels & ListViews in QML. We learned what ListModels & ListViews are and how to utilize them. We reviewed the official Qt Documentation. And more specifically, we determined how to leverage a ListView to generate a set of buttons for our application.
If you missed Part 1, or just need a refresher, check out the video for more information →
Upon starting the demonstration, users are presented with some starter code to kick things off. There is a TextObjects and a Component.onCompleted that will cause a function when the page is initialized. There is also a fetch function presented, this will act as if we were getting data back from an API. While the data within the fetch function are an array of objects with names and phone numbers attached.
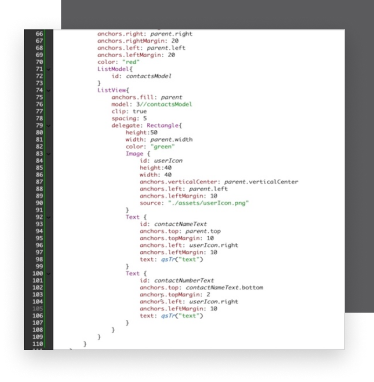
The first step in creating a contact list involves setting a container for the ListView. You’ll want to anchor the top of the container to the header text and anchor the bottom to the bottom of the page. You’ll want to perform similar actions for the left and right sides of the container. And to complete the container, the color to red will help identify the boundaries.
Once the container has been established, the next step involves adding a ListModel Object and giving it an ID of ContactsModel.
Underneath the ListModel line, users will want to create a ListView. Since the ListView already lives within the container users can set the anchor.fill to parent. This will help to save time and skip on styling. Once anchor fill has been established, we want to set the ListView to reference the ListModel.
Next step involves creating a delegate. Within this delegate, you’ll want to add an ImageObject. For this demonstration, a simple icon from the assets directory will be used, and it will be one that can be easily identified as an emblem for contacts. From there you will want to add TextObject to display both contact name and their phone number.

Moving on to the fetch function, users will want to start populating their ListModel with data. Under the array, you’ll want to call a function that passes as the response array as a parameter. To populate the ListModel function, make sure the ListView is referencing the ListModel ID. From there, users should iterate over the parameter being passed, to the function with the .forEach method.
Inside the method, you want to reference the ListModel ID which is ContactsModel. This is where you want to call the append method on your ContactsModel, and pass an object of ObjectName and ObjectNumber.
The next step involves referencing the contactName and contactNumber to populate the ListModel. To do this users want to go to the contactName TextObject, and set the text property to contactName. Once complete, do the same for contactNumber.
To wrap things up, you’ll want to adjust the existing red and green container colors to a clean greyscale look.
This has been a brief overview on creating a contact list by using ListModels and ListViews in QML. We hope you found this video tutorial to be informative and enjoyable. Make sure to drop a comment on any of our social media platforms if you have suggestions or requests for new topics you’d like to hear more about!
Are you looking to build your first app, or in search of a custom-built app for your organization? Look no further, GeoMarvel builds custom applications to fit your business needs. Reach out to our industry experts to start a conversation about your unique needs today.